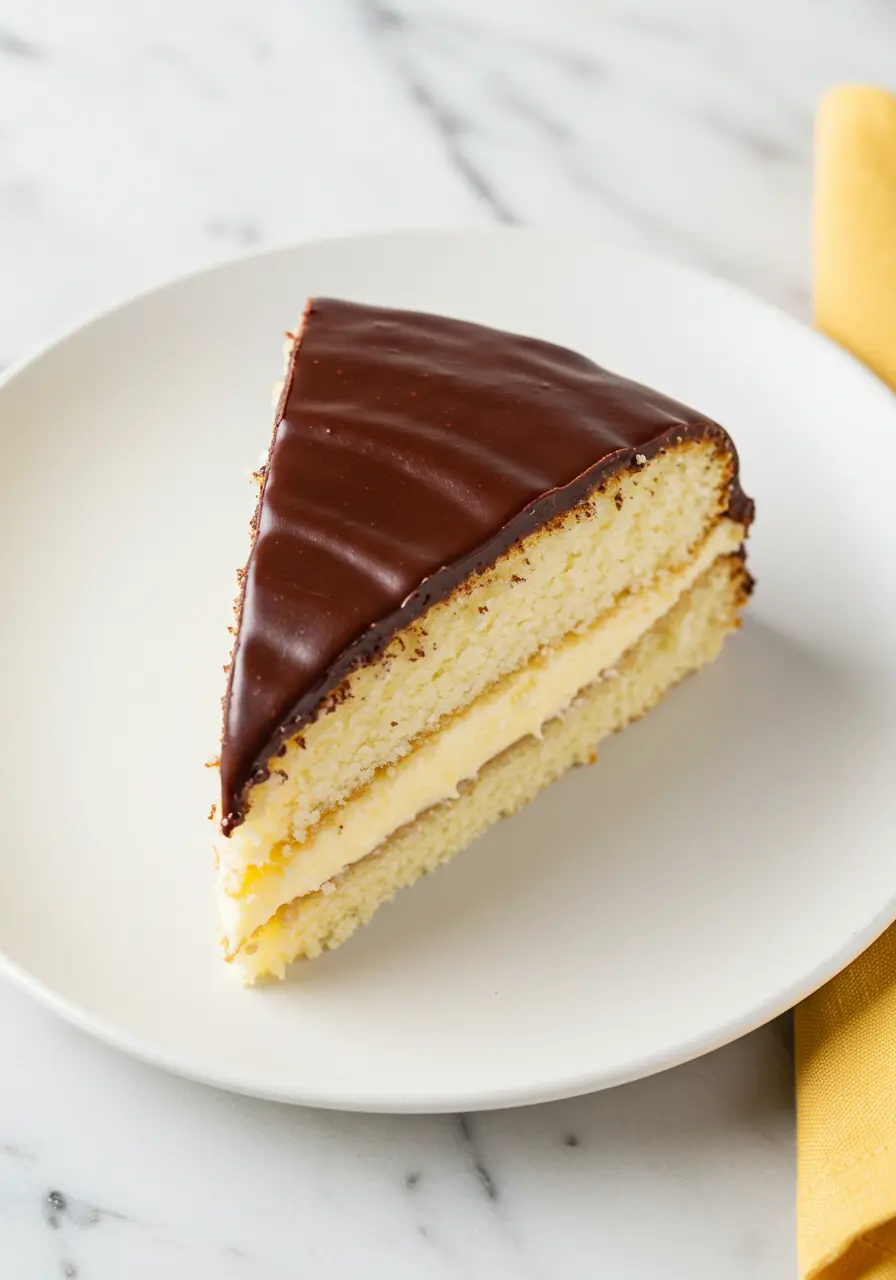
Let me tell you something, Boston Cream Pie has always felt like the dessert version of a mic drop. That silky vanilla cream, the light and fluffy cake, and that glossy chocolate glaze on top? More than a sweet treat… it’s an unforgettable indulgence.
This Boston Cream Pie Recipe is my personal take on a classic , the kind of dessert I now bring to birthdays, family dinners, and honestly… sometimes just a random Wednesday when I’m craving something creamy and chocolatey.
Jump to
The best part? You won’t need to be a pro baker to pull it off. If you can mix, whisk, and layer, you can make this.
You get that rich, creamy filling and glossy chocolate glaze , all without standing over a stovetop or whipping out a candy thermometer. You’ll feel like a pro, minus the pressure.
Why You’ll Love This Recipe
- This isn’t your typical “box cake” situation. With a few simple additions, the texture becomes ultra-moist, tender, and elevated. It’s our little secret.
- People will ask, “Where did you get this from? Then comes the smile, the proud whisper of ‘I made it.’ That moment holds a power all its own.
- This Boston Cream Cake has all the charm of the classic dessert you remember from diners or special occasions , but with a homemade twist that feels a little more grown-up and gourmet.
The Ingredients You’ll Need
- White Cake Mix- The shortcut to a soft, fluffy cake. It gives you a great base so you can focus on the fun stuff, like that creamy filling!
- All-Purpose Flour- Think of this as the cake’s core strength. It holds everything in place while maintaining a whisper-light, airy elegance.
- Granulated Sugar- Sweetness, texture, and a little rise. This sugar makes your cake just sweet enough and gives it that perfect crumb.
- Vegetable Oil- Keeps the cake moist and light. Forget heaviness, this is all softness and melt-in-your-mouth perfection.
- Milk- Brings everything together. It adds moisture and richness, making sure your cake stays soft and fluffy.
- Sour Cream- The secret to a moist cake with just the right balance of richness and tang. It’s what keeps this cake feeling super indulgent!
- Eggs- They bind everything together and help the cake rise. Plus, they give the cake that beautiful golden color.
- Vanilla Extract- Pure magic in a bottle. It adds that comforting, sweet aroma and flavor that makes the cake irresistible.
- Instant Vanilla Pudding Mix- Makes the filling extra creamy and smooth. No cooking required, just whisk and chill for that perfect texture.
- Heavy Cream- Rich, smooth, and luxurious. It makes both the filling and glaze feel indulgent and velvety.
- Semisweet Chocolate Chips- The glaze that ties it all together. These melt into a rich, glossy chocolate layer that makes the pie shine.
Note: This is just a quick rundown of the ingredients I used and why, to find all the details and measurements, simply scroll down to my recipe card!

How to Make Your Perfect Boston Cream Pie
Get Your Cake Ready
Start by setting the oven to 350°F (175°C); this marks the beginning of your baking journey.
Grab your cake pans (8-inch), grease and flour them well, and don’t forget to add a parchment paper circle to the bottom, this little step makes removing the cakes a breeze later on.
In a large bowl, toss in your white cake mix, granulated sugar, and all-purpose flour. Just a quick whisk to unify everything into a smooth blend.
Now, add your remaining ingredients, vegetable oil, milk, sour cream, eggs, and that sweet vanilla extract.
Begin on low speed for 30 seconds until it starts coming together, then turn up to medium speed and mix for about 2 minutes. You want the batter to be velvety and lightly fluffy, with a perfect texture.
Once it’s all mixed, divide the batter evenly between your prepared pans.
Pop them in the oven and allow to bake for 25 to 30 minutes, until perfectly done. Check the cakes by inserting a toothpick, it’s done when it comes out clean or with a few crumbs clinging.. Let them cool completely before moving on to the next steps.
Whip Up the Vanilla Cream Filling
While your cakes are cooling, let’s work on the filling that’s going to make your Boston Cream Pie pop.
Place the instant vanilla pudding mix and heavy cream in a bowl and mix them together. Start mixing on low speed, and once it’s all blended, turn it up to medium-high.
Whip it until it thickens into a dreamy, fluffy filling. If it feels a little too thick, just add a little more heavy cream to loosen it up until it’s perfect.
Create the Luxurious Chocolate Ganache
Now, let’s talk about that silky chocolate ganache. Place the chocolate chips in a microwave-safe bowl, then pour the heavy cream on top.
Heat it for 30 seconds in the microwave, then mix until the texture is smooth and uniform. If the chocolate isn’t fully melted yet, microwave for another 30 seconds and stir again.
Let the ganache cool for around 10 minutes before using. It should thicken a bit, but it still needs to be pourable, not too hot, just perfectly glossy.
Put It All Together
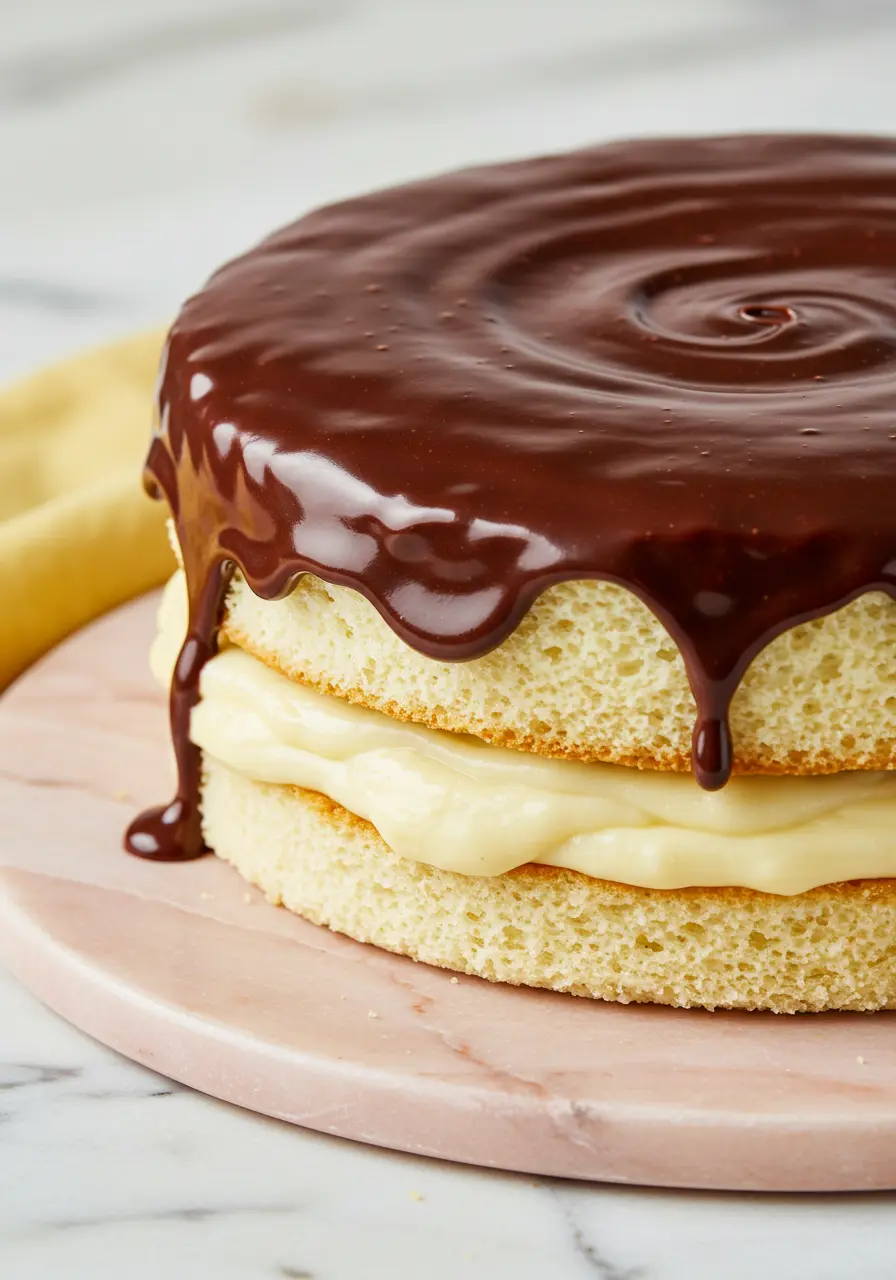
After the cake layers have cooled to room temperature, it’s time to start assembling your Boston Cream Pie. Carefully position the first cake layer on your serving plate.
Spread a generous amount of the vanilla cream filling on top. Be generous, this is the essence of the pie, and it’s meant to take center stage.
Then, with care, add the second layer of cake on top. Don’t worry if it’s a little messy, it’ll all come together in the end!
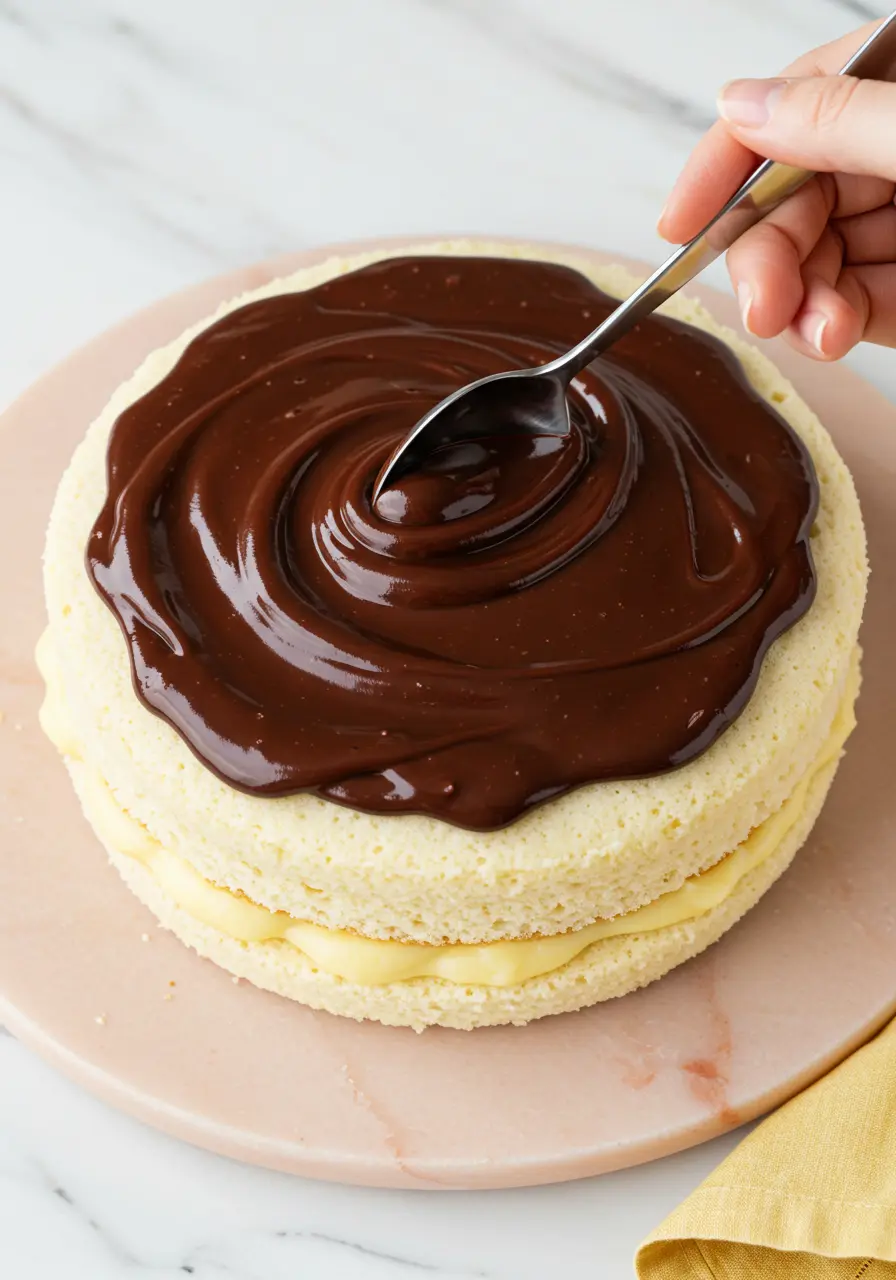
Now, take that beautiful chocolate ganache and pour it over the top of the cake. Let the ganache gently spill down the sides for that classic Boston Cream Pie look.
And there you have it! Get ready to impress.
Loved this? There’s so much more to explore! Follow me on Pinterest for tasty recipes and baking inspiration and be sure to pin this one for later!
Don’t Let These 3 Little Mistakes Ruin Your Boston Cream Pie
Skipping the Cooling Time
It’s tempting, I know, you want to layer that beauty as soon as it’s out of the oven. But trust me, if your cake or filling is even slightly warm, everything will slide around or melt. Let the cake cool completely, and pop the cream filling in the fridge to firm up. A little patience = a picture-perfect pie.
Not Leveling Your Cake Layers
Uneven layers = wobbly cake. If your cake domes a bit while baking, gently level the tops with a serrated knife before assembling. This gives you a flat, stable base and a clean, bakery-style finish. Plus, those cake trimmings? Little baker’s treat for you.
Overmixing the Batter
It’s easy to get carried away, but mixing too long can make your cake dense and heavy. Once everything’s combined and smooth, stop the mixer and move on.
How to Store Your Boston Cream Pie
Pop it in the fridge, always.
This beauty’s got a creamy center that loves the cold. Keep it in an airtight container in the fridge so everything stays fresh and fabulous.
Protect that glossy ganache.
Nobody wants smudged chocolate! Skip the plastic wrap straight on top, use a cake dome or gently tent with foil to keep it pretty.
Let it chill before slicing.
Want neat, bakery-style slices? Let your pie rest in the fridge for an hour or two before cutting. Everything holds together like a charm.
Make-ahead magic? Freeze just the cake layers.
If you’re baking ahead, freeze the cake layers on their own (wrapped tight!). When you’re ready, thaw and assemble fresh for the best texture.
More Classic Cakes You’ll Love
Did you try making this recipe? It will make me so HAPPY if you rate it⭐ and share your thoughts in the comments section below!

How to Make the Best Boston Cream Pie in Easy Steps
Let me tell you something, Boston Cream Pie has always felt like the dessert version of a mic drop. That silky vanilla cream, the light and fluffy cake, and that glossy chocolate glaze on top? More than a sweet treat... it’s an unforgettable indulgence.
Ingredients
Cake Layer Ingredients
- 1 ox White Cake Mix
- ½ cup All-Purpose Flour
- ½ Cup Granulated Sugar
- ½ cup Vegetable Oil
- ½ cup Milk
- 1 Cup Sour Cream
- 3 Large Eggs
- 2 teaspoons Vanilla Extract
Vanilla Cream Filling
- 1 (3.9 oz) box Instant Vanilla Pudding
- 2 cups Heavy Cream
Chocolate Glaze
- ¾ cup Heavy Cream
- 1 cup Semisweet Chocolate Chips
Instructions
- Begin by setting the oven to 350°F (175°C), then prepare two 8-inch round cake pans.
- Lightly grease and flour them, then add a round of parchment paper to the bottom of each, this makes removing the cake layers super easy later on.
- In a large mixing bowl, whisk together the white cake mix, sugar, and flour until well combined.
- Then add in the milk, sour cream, oil, eggs, and vanilla extract. Begin on low speed to blend the ingredients, then switch to medium and continue mixing for around 2 minutes, until the batter is smooth and airy.
- Split the batter evenly between the prepared pans and bake for 25 to 30 minutes, until a toothpick inserted in the center comes out mostly clean. After baking, cool the cakes entirely
- While the cakes are cooling, prepare the vanilla filling. In a mixing bowl, combine the instant vanilla pudding mix with heavy cream and whisk until smooth.
- Start slowly, then increase to medium-high speed until it thickens into a light and fluffy cream. If it feels a bit too thick, just stir in a splash of extra cream to loosen it up a little.
- For the ganache, place the chocolate chips in a microwave-safe bowl and pour the heavy cream on top.
- Microwave for 30 seconds, stir, and repeat once more if needed until the chocolate is nearly melted. Let it sit for a minute, then stir until silky smooth.
- Let the ganache cool for about 10 minutes, it should thicken slightly but still be pourable.
- Begin assembly by placing one cake layer on a serving dish, then smooth the vanilla filling on top.
- Gently layer the second cake over it to finish the stack.
- Then pour the ganache right in the center of the cake and guide it toward the edges, letting it drip slightly down the sides for that signature look.
- And that’s it, your Boston Cream Pie is ready to wow!
Notes
- Avoid overbaking or your cake will dry out fast, start checking it a few minutes early just to be safe.
- If your ganache gets too thick, don’t panic, just warm it for a few seconds and stir.
- Use a serrated knife if you need to level the cake layers, it helps keep crumbs to a minimum.
- Don’t use cold eggs or sour cream, room temp helps everything mix smoother.
Nutrition Information:
Serving Size: 1 sliceAmount Per Serving: Calories: 450Total Fat: 29gSaturated Fat: 13gCholesterol: 95mgSodium: 300mgCarbohydrates: 42gFiber: 1gSugar: 28gProtein: 4g
Nutritional information is provided as a general guideline and is calculated using standard online tools. Variations may occur depending on the specific ingredients and methods used.